Dual CLI
Go from a folder of files to minted smart objects in one command. One API key, one config file, and batches you can rerun without minting anything twice.
dual is the command-line tool for the Dual platform. Describe a drop in a single YAML file, point it at a spreadsheet or a folder of files, and the CLI uploads the artwork, creates the face and the template, and mints the objects. The same tool transfers, updates and runs any other action, on one object or on ten thousand.
It is a single binary with nothing to install alongside it. Every call goes through the public API with an API key, and the platform signs each action for the key's wallet. No private key ever touches your machine, and there is no nonce to manage.
The source is on GitHub under the MIT licence.
Install
curl -fsSL https://get.dual.network | sh
The installer picks the build for your machine (macOS or Linux, Intel or ARM), checks it against the published checksums, and puts dual in ~/.local/bin. If that folder is not on your PATH, it prints the line to add to your shell profile.
Check the install with dual version. If you would rather build from source, clone the repository and run go build . with Go 1.26 or newer.
Authenticate
All the CLI needs is an API key for the organization you want to work in. Create one in the Dual Console or through the API (see Authentication), then store it:
dual login
login prompts for the key without echoing it, checks it against the API, and files it under the organization it belongs to. You never type the organization yourself, and a mistyped key fails here rather than halfway through a batch.
Keys are stored in your user config directory, readable only by you, and never in a project folder or in dual.yaml. Logging in again for the same organization replaces the key in place.
You can also pipe the key in, which keeps it out of your shell history:
op read op://vault/dual/api-key | dual login
In CI, set DUAL_API_KEY in the environment and skip login altogether.
More than one organization
Log in once per key. Each is stored under its own organization, and you can switch between them or override for a single command:
dual switch # list what is stored, * marks the defaultdual switch "Acme Staging" # change the default, by name or iddual mint --org Acme # use another organization for one command
The most recent login becomes the default. When two stored organizations share a name, the CLI asks for the id instead of guessing.
How the key and the host are chosen
The config wins over the store for the host because the config says where that drop lives. The store fills in for commands run without one.
Your first drop
A drop is a folder with a dual.yaml in it. The quickest way to get one is to let the CLI write it.
1. Scaffold it
You get a complete drop with two items and placeholder art, so every step below works before you have supplied anything of your own:
Two flags change the shape of what is scaffolded. --folder writes numbered assets/0.json and 0.png pairs instead of a CSV, which suits a generated collection. --template-id writes only the items, for minting into a collection that already exists.
2. Check it
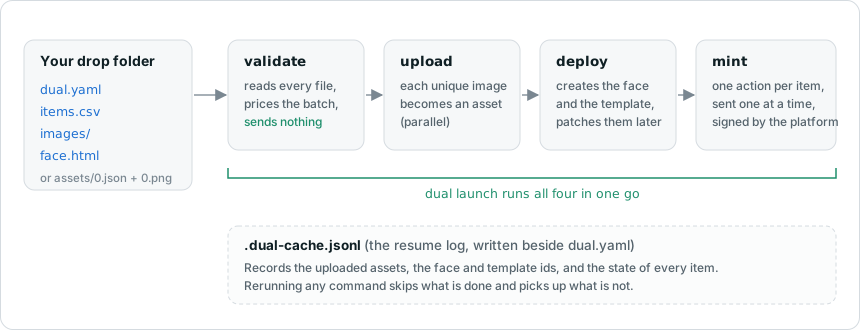
validate reads everything and writes nothing, so run it as often as you like, against production too. It counts the items and objects, confirms every referenced image exists, shows whether the face and template will be created or reused, and prices the batch against your organization's balance. Malformed recipients are caught here, before a single request is spent on them.
3. Launch it
launch runs four steps in one go:
validate, as above.uploadsends every unique image and records the resulting asset. Rows that share a file upload it once.deploycreates the face and the template, and points the template at the face.mintsends one action per item, with the uploaded asset written intometadata.image.
Each step is also a command of its own, so you can dual upload today and dual mint tomorrow.
4. Run it again
Rerunning is how you update. Edit face.html or the template block in dual.yaml, run dual launch again, and deploy patches the face and template that already exist. Items that were minted are skipped.
5. See what happened
report turns the run into a CSV you can reconcile against your source spreadsheet, one line per object with its id, public URL, action id and any error. It reads only local files, so it is safe to run at any point, even while a batch is still going.
The drop config
One file describes the whole drop. The API key is kept out of it on purpose, because this file gets committed.
api: https://api.dual.networkface:name: Ticketrenderer: go-templateviews:- variant: card # card, default, detail or sharemedia_type: text/html # text/html, image/png, image/jpeg, image/webp or image/svg+xmlcontent_file: ./face.htmltemplate:name: Summer Dropactions: [mint, transfer, update]factory:max_supply: 5000start_time: 2026-09-01T00:00:00Zobject:metadata:category: ticket # defaults every object inheritsitems:csv: items.csvimage_dir: imagesprovider: gcs # gcs or ipfsis_public: truemapping:metadata.name: titlemetadata.description: blurbmetadata.image: filecustom.seat: seat
The three blocks map onto three platform concepts:
faceis the visual layer. Leave it out to mint objects with no face.templateis the collection.actionsmust includemintfor anything to be minted,factorysets an optional supply cap and mint window, andobjectholds defaults that every minted object inherits. Each item row merges on top.itemsis where the objects come from, described below.
Set template.id or face.id to use something that already exists instead of creating it. A face is attached when its template is created, so pairing template.id with a face: block that has no id is rejected rather than creating a face nothing references.
Actions take a bare name, or the full form when you need to configure one:
actions:- mint- name: updateaccess: { type: private }- name: remoteurl: https://hook.example.com
Unknown keys are an error, so a typo fails at load time instead of becoming a silent default. Relative paths resolve against the config file, so the CLI works from any directory.
Where the items come from
Both sources produce the same thing: a data block per object, plus an optional recipient and copy count.
A spreadsheet
mapping points a dotted object path at a column, so your CSV can keep whatever column names the rest of your business already uses. Without a mapping, the headers themselves are the paths.
tier,notes,artwork,seat,price,to,numFront row,Closest to the stage,front-row.png,A1,250,0x1111111111111111111111111111111111111111,1Front row,Closest to the stage,front-row.png,A2,250,,1Mid tier,A clear view of everything,mid-tier.png,M14,120,,1Back row,The cheapest way in,back-row.png,Z9,45,,2
Two columns are always read directly and never written into the object:
tois the recipient: an Ethereum address, or the email of someone who already has a wallet in your organization. Leave it blank to mint to your own wallet. Use an address for anyone who has not signed up yet.numis how many identical copies the row mints, up to 100. Blank means one.
Cells are typed the way the API expects. metadata.name stays text even when it looks like a number, metadata.edition becomes an integer, and everything else is read as JSON where it parses, so true, 42 and ["a","b"] all arrive as the right type.
A folder of files
Numbered pairs, the layout a generator produces:
assets/0.json 0.png1.json 1.jpg2.json 2.png
Each JSON file is the object's data block, so no mapping is needed:
{"metadata": { "name": "Sunken Lantern", "description": "It still burns." },"custom": { "rarity": "common", "depth_m": 40 }}
The image beside each file is picked up automatically, and you can name a different one with metadata.image. Files sort numerically, so 2.json comes before 10.json. to and num at the top level of the JSON work exactly like the CSV columns.
The face
face.html is a Go template. When the wallet or a public page shows an object, the platform renders the template with that object's data, so the file can read .metadata.name, .metadata.image.url, .custom.seat and so on.
<div class="ticket"><img src="{{ .metadata.image.url }}" alt="{{ .metadata.name }}"><div class="body"><h1>{{ .metadata.name }}</h1><div class="seat">Seat {{ .custom.seat }} · {{ .custom.event }}</div><p>{{ .metadata.description }}</p></div></div>
Rendered for the first row of the ticket example, that face looks like this:

Every field a template names must exist on every object, so put shared fields in template.object and per-item fields in every row. A face can carry several views: card for lists and the wallet inventory, detail for the full object page, and default and share for the remaining contexts. Each view is either inline source or an external HTTPS url. Faces explains how the wallet chooses between them.
Rerunning is always safe
A drop of unique items is one request per item, and a big one takes a while. If a laptop lid closes or a connection drops partway through, you should not have to work out which rows made it. With the CLI you don't. Rerunning the same command is always the right move.
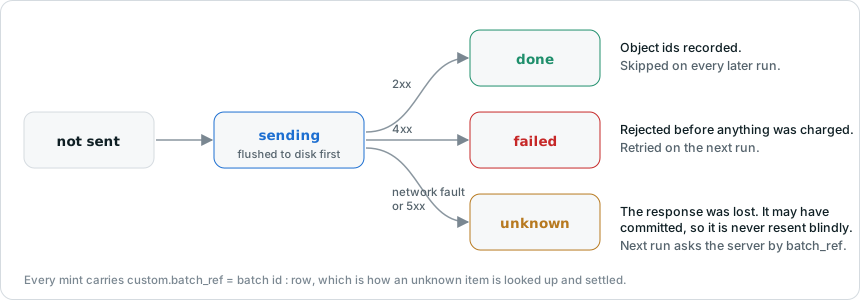
Next to dual.yaml the CLI keeps a resume log that records the uploaded assets, the face and template ids, and the state of every item. It is written so that a paid action can never happen twice:
- An item is marked as sending and saved to disk before its request leaves.
- Every mint carries a marker made of the batch id and the row number.
- A rejected item is marked failed. Nothing was charged, and the next run retries it.
- An item whose response was lost is left unknown. It may have gone through, so it is never resent blindly.
- The next run looks up only the unknown rows by their marker and settles them against the server.
Here is what that looks like with two things going wrong at once. One row names an email with no wallet, and one response is lost on the way back:
The run stops and tells you what to do next. verify settles the lost item against the server and shows why the other one failed:
Fix the recipient in items.csv and run mint again. Only the failed row is sent, and the three finished rows are skipped:
report then gives you one line per object, including the recovered one. Deleting the log starts a genuinely new drop, and also forgets the face, template and uploaded assets, so the next run creates them all again.
One object at a time, and other actions
Pass --num, --to or --data to mint and it mints a single object, with no config and no resume log. transfer, update and action <name> work the same way:
dual mint --template-id 68b1… --num 2 --to 0x9f8e… # two copies to an addressdual transfer --id 68cb… --to alice@example.com # change the ownerdual update --id 68cb… --data '{"seat":"A3"}' # merge into custom datadual action burn --payload '{"id":"68cb…"}' # any other action
Each also takes --csv for a batch, where the headers are dotted paths inside one action payload:
dual transfer --csv moves.csv # id,todual update --csv edits.csv # id,data.colour,data.sizedual action burn --csv burns.csv # id
These batches get their own resume log too. They have no collection to page through, so an item left in flight waits for you to decide: the run summary reports it, and --retry-unknown resends it.
Throughput and limits
The API allows about five requests per second per key, and the default --rate 4 sits just under that. Actions are sent one at a time because every action from one key shares a single sequence number. --concurrency speeds up uploads, which have no such constraint.
IPFS assets are always public, so use is_public: true with that provider or choose gcs.
Next steps
- CLI Reference lists every command, flag, config key and exit code.
- The repository ships two complete drops in examples/, one driven by a CSV and one by a folder of numbered files. Copy whichever matches your source.
- Dual Wallet is where the people you mint to will see what you made.